
Touring Bicycle Photos and Descriptions
Paul Woloshansky's Homemade Bike Gear
On several of my tours in Asia and Australia I’ve been forced to carry up to 17 litres of water, not to mention 3-4 day’s food, fuel for my stove, camping gear, tools, spares and all the rest, and I’ve yet to come across an aluminum rack that didn’t break under the strain. I’ve spoken to a lot of other cyclists who do similar tours, and they all have disaster stories to relate, of precious time wasted looking for a welder, or of being marooned on the side of a road or trail, mending broken racks with splints and wire cut out of fences, and even wrapping spare spokes and twisting them, ‘rebar’ fashion, to keep the whole together...I ask you, what good is a guarantee, when you’re way-the-hell-out in the middle of nowhere? And numerous times I’ve seen $$$ panniers patched with duct tape or secured on with shoelaces or innertubes; once even a bound-and-knotted arrangement, that utilized a pair of XC-ski long underwear!
Those very up-market Gordon and Sakkit racks are out of my reach, $-wise; no point in even thinking about them - the money I’d have to spend, including exchange, duty, and shipping would keep me literally for months in India... I think it makes much more sense to save the money, to invest in Goan beer....
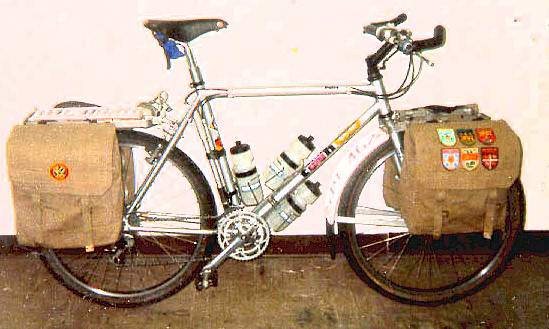
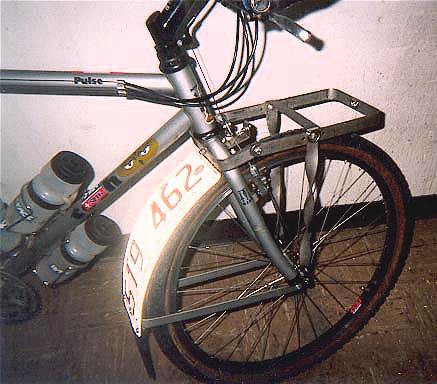
So, to put an end to failures at the most inopportune time (as if there could ever be an opportune one...), I decided to cobble together my own racks and panniers. As I mentioned, I no longer put any faith in aluminum as a material for racks, so I chose 1" x 1/8" ‘316’ stainless-steel bar stock. I realize this translates as heavy (and it is, relative to the Bl******n’s and Na****a’s that I used-and-abused previously), but the finished articles are fairly close to the published weights of the aluminum Jandd racks, found in the Rivendell catalogue. Grant Petersen of Rivendell bicycles has seen mine, and commented that they resemble racks he saw in Japan on courier bikes, which were made for up to 50 kilogram payloads. In fact I ‘pinched’ an idea from an Indian bicycle manufacturer’s racks, by putting a twist in my front’s single stays and in two of the rear’s four stays, to stiffen them up. They’re not completely rigid, however; I’ve found that a little ‘give’ is a good thing, to absorb shocks - when expedition loads are mounted on a rock-solid rack, I’ve found there’s a risk that shock energy will be expressed not only in rack failures, but also in bent or broken bike frame eyelets and drop-outs; potentially a much more serious problem, if it were to occur in an isolated area far from water. The Aussies out there know all about that....
My choice of common, easily-obtained material with which to build my racks was part of my overall strategy to come up with equipment that was not only strong and dependable, but simple in design and execution; the rationale being that by keeping it simple, repairs or modifications in the future would also be simple, and reflect the reality of the non-technical (or often non-existent) support available to me on tours in my favourite places. Did I really need welded racks? Well, I would’ve, had I used tubing rather than bar stock. Tubing would’ve necessitated a greater amount of time, money, and labour, and I would be drifting farther away from my ideal of simplicity. And what if I welded something up, and I found I’d made a mistake in the dimensions, or something? I’d be stuck with...scrap. Bar stock was the obvious choice: what could be simpler than bending and drilling holes, and then bolting a rack together? If there were a problem with dimensions, I could always just drill another hole.
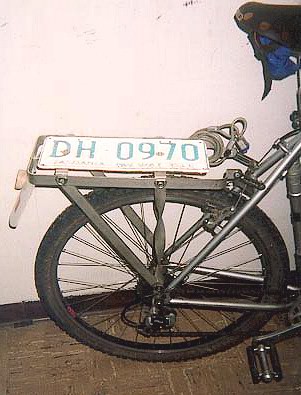
I used the following tools, which are found universally in any metalworking shop: a bench-mounted vise; hacksaw; mill file; ball-pein hammer; center-punch; large Crescent wrench (for bending); scriber (a nail works); electric drill, and drill bits (cobalt bits work best on stainless steel, but if you have a lot of time and patience and go slow, and use cutting oil (and know how to sharpen drill bits...), High Speed Steel bits will be OK; and finally I used a chunk of 1 ?quot; O.D. plumbing pipe to radius the bends. A by-product of my bolted-together racks is the simplicity of ‘leveling’ it on different bikes using spacers and pre-drilled holes, and also in its ability to fold flat in the bottom of a bike box, when the bike is packaged up to travel.
Regarding panniers: UV’s really deteriorate nylon (noticeably so in Oz), and a lot of the $$$ stuff seems to rely on chintzy, light metal hook attachments or complicated strapping, which only lasts while Velcro is new and dry. I decided to go with canvas after seeing a bike with a pre-war Carradice saddlebag still in good shape. My panniers are adapted from WW II Canadian army surplus, $10 each, and I re-inforced the seams with linen thread (dental floss) at points of strain. The stiffeners are fashioned out of scrap aluminum sheet with edges duct-taped, Kirtland-style, to prevent chaffing and then bolted inside. These stiffeners eliminate any sagging of the panniers into the wheel, even with the front rack’s single stays. The hooks are 2" deep to lessen the chances of panniers being ‘bucked off’, and are made of the same material as the racks. Shock-corded S-hooks ensure my panniers stay put.
Canvas is a very durable material and even though it’s cotton, proves to be remarkably water-proof; the tightly-woven fibres expand and act as a seal. Even when the outside appears sodden, inside there’s often no sign of moisture at all. Patching abrasions is easy, and if I was ever to damage a bag beyond repair, all I’d need to do is buy another bag, and install my stiffener, hooks, etc. into it. It appears that all Commonwealth countries share similar military equipment designs; I’ve seen the same bags for sale in Australia, at "Aussie Disposals" surplus stores, and a Brit friend confirmed the design was in use from WW I, until well after WW II and is readily available in the UK.
I don’t think lowrider-type racks are suitable for my kind of touring, due to the absence of a top platform - my front rack’s platform provides a space on which to lay a tent, plus allows extra water (carried in 2-litre pop bottles slung together) to be draped over the top. In Nepal, India, and Thailand I’ve cycled in water up to my hubs and b/b, and in foot-deep or more ruts; either the resistance of flowing water against lowrider-mounted panniers, or their contacting the ground would’ve made my bike unrideable.
Another thing: the platforms on most ‘storebought’ racks are tiny, and it’s difficult sometimes to set them up so that shoe heels don’t rub rear panniers, and with all that must be piled on the bike, there’s soon a growing resemblance to a ‘rubbish-heap’: my rear rack has a platform of 7" x 17," which yields almost twice the area of the Blackburn’s 5"x 12," allowing room for everything and still leaving ample space for heel clearance, working on brakes, and wheeltruing.
Sheldon Brown commented that with the loads I carry, I should consider using a trailer. I did consider a "B.O.B." once, but I concluded that pre- and post-tour travel by air or bus would become even more complicated....
Even with four 2-litre pop/water bottles draped over both front and rear racks, I find myself compensating naturally for sluggish steering when fully loaded. I don’t share a typical MTBer’s speed and need for maneuverability on expeditions, and it’s not an issue when I’m on the road and have easy access to water: I simply discard the bottles and load down accordingly. I don’t always tour ‘kitchen sink’-like; most tours I carry 30 to 35 pounds - somewhat less than many of the purely-road tourists I encounter. I just like to have a large total capacity as an option that permits me the greatest leeway in choosing routes, since I often hear locals say things like:
"There’s a prettier way to go, but there’s nothing out there at all...."
Paul Woloshansky
Back to the Main Photo Index | Touring Bike Index Page | Paul Woloshansky's Bike and Homemade Gear | Jeff Kruys Bike | Andy MacGee's Homemade Bike | Andy and his Bike | Peter's Bike | Jon Erik Larson's Sakkit Bike | Francisco Dellatorre Borges' Bike | Aussie Off-Road Tourer | Today's Bicycle Equipment Commentary |
Bike China Adventures, Inc.
Home | Guided Bike Tours | Testimonials | Photos | Bicycle Travelogues | Products | Info | Contact Us
Copyright © Bike China Adventures, Inc., 1998-2012. All rights reserved.